
How to share and collaborate on models in Rayon
Sharing and collaborating on models in Rayon: email invitations, roles and public links, plus real-time editing, comments, annotations and shared workspaces.
What you'll learn
Learn how to share Rayon models with clients and colleagues, collaborate simultaneously on drawings using comments and annotations, and manage team permissions across shared workspaces.
Open Sharing Panel and Invite Users
Click the share button in the top right-hand corner of the screen to open the access panel. Type a collaborator's email address and assign their role as admin, editor, or viewer before clicking invite. Alternatively, click the multi-user button to enter multiple email addresses simultaneously and invite an entire team.
Share Model via Public Link
If you want to share a model without specifying individual recipient emails, switch on the public toggle within the sharing panel. This action generates a public link for the model that you can copy and send directly to clients or collaborators. You can also manage existing invitees by changing their roles between viewer, editor, admin, and owner, or by removing them.
Access Shared Models for Real-Time Collaboration
Open the workspace and select the Shared with me tab on the left-hand panel, then click on models to locate your invited project. Once in the paper or model canvas, you can make edits alongside colleagues and monitor their cursor movements across the drawing in real time. The top right-hand corner displays profile icons showing all active users currently collaborating in the model.
Add Comments and Tag Team Members
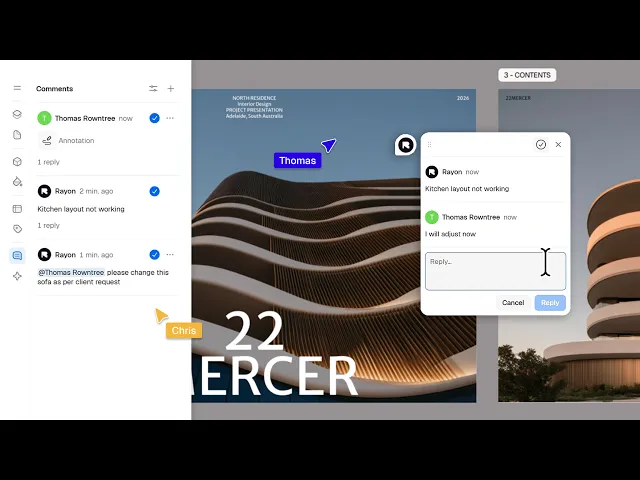
Navigate to the toolbar, open utilities, and choose the comment tool to leave feedback directly on specific drawing elements. Click on the canvas layout to place your comment text regarding requested alterations or space adjustments. Mention a specific team member in your note to ensure Rayon delivers an automated email notification alerting them to resolve the item.
Respond to and Resolve Canvas Comments
Review incoming feedback listed in the left-hand comment panel and double-click any entry to locate it immediately within the paper or model canvas. Type your response in the reply field to discuss adjustments with your team, then click the resolve button to gray out completed notes. Alternatively, click the three dots icon beside any comment to mark it as resolved.
Create Sketches Using the Annotate Tool
Select the annotate tool from the utilities section of the toolbar to draw sketches directly over furniture or layout areas requiring changes. Adding an annotation generates a corresponding thread in the left-hand comment section for your team to view. Collaborators can double-click the annotation thread to reply, discuss drawing revisions, and mark the item resolved when finished.
Review Model as a Viewer
Access models shared with viewer permissions to review drawings safely without moving or modifying design elements. Use the lower toolbar to measure distances between selected points, calculate surface areas, or submit review comments for editors to implement. Viewers can also request editing permissions from project owners or duplicate the model directly from the top interface.
Organize Teams and Shared Workspaces
Return to the workspaces screen and open the top-left dropdown menu to add a team organization with a custom logo, name, and team size. Click the plus button to establish a new workspace, toggle its privacy settings, and access the edit option to transfer ownership. Enter team member emails in the access settings to grant viewer, editor, or admin rights across all models.